Friday, August 12, 2016

Melon Tutorial - How to use Melon (app) as Mp3 Player

So you already have an expired Melon Passes? But I am sure you also have an MP3 of your favorite Korean Songs! (Even non Korean songs will work too!)

So follow this and enjoy playing your MP3 with Melon App! =) =)

Step 1: Click on the Button with Musical Note.
Step 2: Click on the 3rd option (numbered as 2)


Step 3: on the next page, click on the link with musical note to see your MP3 saved in the Device.


Step 4: If you want to just play everything, Select all and click the play button. 


If you click on the play button, this is what you will see in your temporary playlist. You can go to this every time, and just choose shuffle play. 


Step 5: Adding songs to playlist 

If you want to maintain a playlist to organize your MP3s, Add songs to the playlist by clicking on the right lower button. then follow the screenshots. 


How to check your MP3 Playlist? 

Step 1: go to main page, click on the mobile icon (third option), on the next page, click the first link. 


You can also create new playlist in this portion of the App, or just open existing playlists. 


Playing MP3 from the Playlist: Click one song and play this song, it won't move to the next song unless you select all (highlighted) before you click the play button.


To Clear History of playlist, Follow steps below. 

Note: make sure you are in this screen, deleting from this list will not remove your MP3s or DCFs. 


Important: When doing this, and using Melon App as MP3 player,  YOU DO NOT NEED an Internet Connection. 

Melon Tutorial - Download DCF and Make a Playlist

For those who availed of 1 month streaming only, You can Download copies (unlimited) of the song but the file is DCF and is only playable via Melon (i think there are other players but it will be on a different blog post). Follow the steps below. ;) 

Steps 1-4,  Click on the highlighted green bottom of screenshot, Search for the Artist (can be English, but others are in Korean names)

Choose the 3rd one so that you will see the Artist list. (First Tab is their latest albums/singles) 

Choose the Artist by clicking on it. 


Step 5, Click on the 3rd text (boxed) so you will see the artists' discography.

Choose from the latest to their oldest album by scrolling up or down. 


 Step 6, once you have chosen, you can click on the Star on the artist, and also give the album a "heart". 

 Choose the song, or highlight / click all songs in the album if you want to download them all. 

Click the download tab, and it will go to another page, where the summary of your download is shown. Click on the Green Button to download, otherwise just hit the back button to go to previous page.


Do Steps 1 to 6 everytime you want to add a new artist's album to your downloaded files. Once done, you want to check your DCF files, right? So follow the next step to do so. 

Choose the encircled option to see your DCF List. Then when you go to the next page, click on the first option. 


To view DCF files, click on the DCF Tab.  You can select all and play all, or Select one by one and then create a playlist of your choice. 


Creating Playlist: Choose the bottom option. the first option will only put your songs in the history of "played" items in Melon.

New: Just choose a Name and save. 

Rearrange/ Delete Songs: Follow the 2 last screenshots 


This will only work if you have wifi or data. The songs will not play if you do not have access to the internet. =) 


Melon Tutorial - Change your Profile Pic and Banner Photo

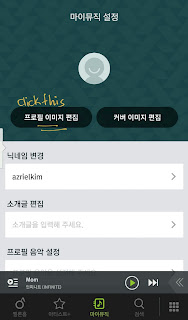
How to Change your Profile Picture


Step 1 - Go to the no. 1 in this photo, 
and then No. 2 to open profile


Step 2 - Click Left most button


 Step 3 - Click upper most option


Step 4 - Choose from your Phone


Step 5 - Crop according to required size


Step 6 - Click the Middle Part to Save


Step 7 - Change your Banner Background


Step 8 - Choose the Background and Save


Step 8 - You are all Set! 
Put a description of yourself in the Second Box Here if you want.  =) 


Disclaimer: I do not claim ownership of the photos I used. Credit to Owners, thank you for sharing them with us! =) God Bless!